I know it's a bit early for Christmas (at least I'm not getting Christmas stuff out in July like the bog box stores!) but since I make Christmas ornaments as gifts each year, I have to get a jump on it! This year's ornaments were inspired by a couple of items, seen here:
Juice can lids and this fabulous find of red buttons that I picked up at one of our local antique stores for $2! Can you believe it?! I just had to have them even though I had no idea what I would do with them at the time.
To begin, I measured a circle to fit inside the juice can lid and cut it out of some heavy antique scrapbook paper. I aged the edge a bit with some brown ink.
Next came some vintage ledger pages. I cut some pieces to fit at the top and bottom of the circle and fancied them up with a scalloped scissors and a bit of green ink on the edges.
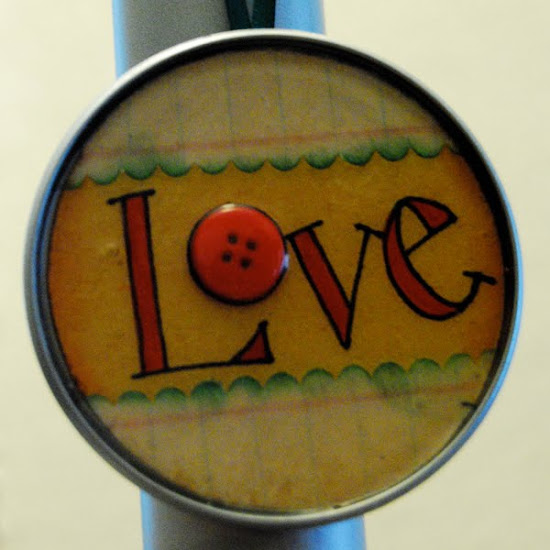
Lettering comes next. I first traced around the little red button that would serve as the "o" and then penciled in the remaining letters.
Then I filled in the letters with red using DecoArt Americana Berry Red.
Once the paint dried, I traced over my pencil lines around the outside of the letters with a fine paint marker and glued on a little red button.
After the glue dried, I poured a bit of DecoArt Triple Thick Gloss Glaze into the juice can lid and spread it around. I then placed the decorated scrapbook circle into the lid and poured more glaze in and distributed it evenly in the lid by slowly turning the lid at an angle so as not to create air bubbles. If air bubbles do appear, just use a toothpick to pop them.
Once the glaze is completely dry (I usually allow for about 24 hours just to be safe) add a ribbon hanger at the back. I cover the entire back with a circle of felt cut to size to make it nice and presentable on both sides.
Now it's time to start cranking out bunches of them for my friends and family! I'll be making a variety of them with Love, Hope, and Joy since those words all have "o"s in them!
Thanks again to DecoArt for giving me great supplies to play with!
Also, if you want a chance to win a yard of my Spoonflower fabrics, check out this post and answer the question following the post!


You're very clever. I'm happy that YOU enjoy doing this sort of thing.
ReplyDeletejust found you on Sew4Home and love your blog! this little decoration is wonderful and I hope to make a few! thanks so much!
ReplyDeleteWay to go! It is just adorable, good job!
ReplyDeletelove this economical idea! thanks so much...plan to make lots!!!
ReplyDeleteLovely! I would love for you to link up on my blog here:
ReplyDeletehttp://singingthreelittlebirds.blogspot.com/2010/11/christmas-ornament-link-up-singing.html
How wonderful! I've added my link!
ReplyDeleteThis is a simple, easy craft! Thanks for sharing
ReplyDelete